Yolov5 Model Preparation Example#
Warning
This page is deprecated - modification of Yolo_v5 output layers is no longer necessary.
This page demonstrates preparation of a custom model, specifically yolov5s from ultralytics/yolov5 GitHub repository. The conversion follows Pytorch -> ONNX -> OpenVINO™ IR format.
1. Setup#
Clone YOLOv5 repository
git clone https://github.com/ultralytics/yolov5
Set up the environment
pip install -r requirements.txt
pip install onnx
Download Pytorch weights
wget https://github.com/ultralytics/yolov5/releases/download/v3.0/yolov5s.pt
2. Pytorch to ONNX Conversion#
Note: An image size of 416 is selected in this example, one could set other sizes
python3 export.py --weights yolov5s.pt --imgsz 416 --batch 1 --include onnx
The output should resemble
export: data=data/coco128.yaml, weights=['yolov5s.pt'], imgsz=[416], batch_size=1, device=cpu, half=False, inplace=False, train=False, optimize=False, int8=False, dynamic=False, simplify=False, opset=12, verbose=False, workspace=4, nms=False, agnostic_nms=False, topk_per_class=100, topk_all=100, iou_thres=0.45, conf_thres=0.25, include=['onnx']
YOLOv5 🚀 v6.1-207-g5774a15 Python-3.8.10 torch-1.11.0+cu102 CPU

Fusing layers...
YOLOv5s summary: 232 layers, 7459581 parameters, 0 gradients

PyTorch: starting from yolov5s.pt.1 with output shape (1, 10647, 85) (14.5 MB)

ONNX: starting export with onnx 1.11.0...
ONNX: export success, saved as yolov5s.pt.onnx (28.7 MB)

Export complete (1.57s)
Results saved to /home/vidyasiv/yolov5
Detect:          python detect.py --weights yolov5s.pt.onnx
PyTorch Hub:     model = torch.hub.load('ultralytics/yolov5', 'custom', 'yolov5s.pt.onnx')
Validate:        python val.py --weights yolov5s.pt.onnx
Visualize:       https://netron.app
3. ONNX to IR Conversion#
During conversion to IR format with the model optimizer, specify --output with the names of the final output convolution layers in the ONNX file as shown below.
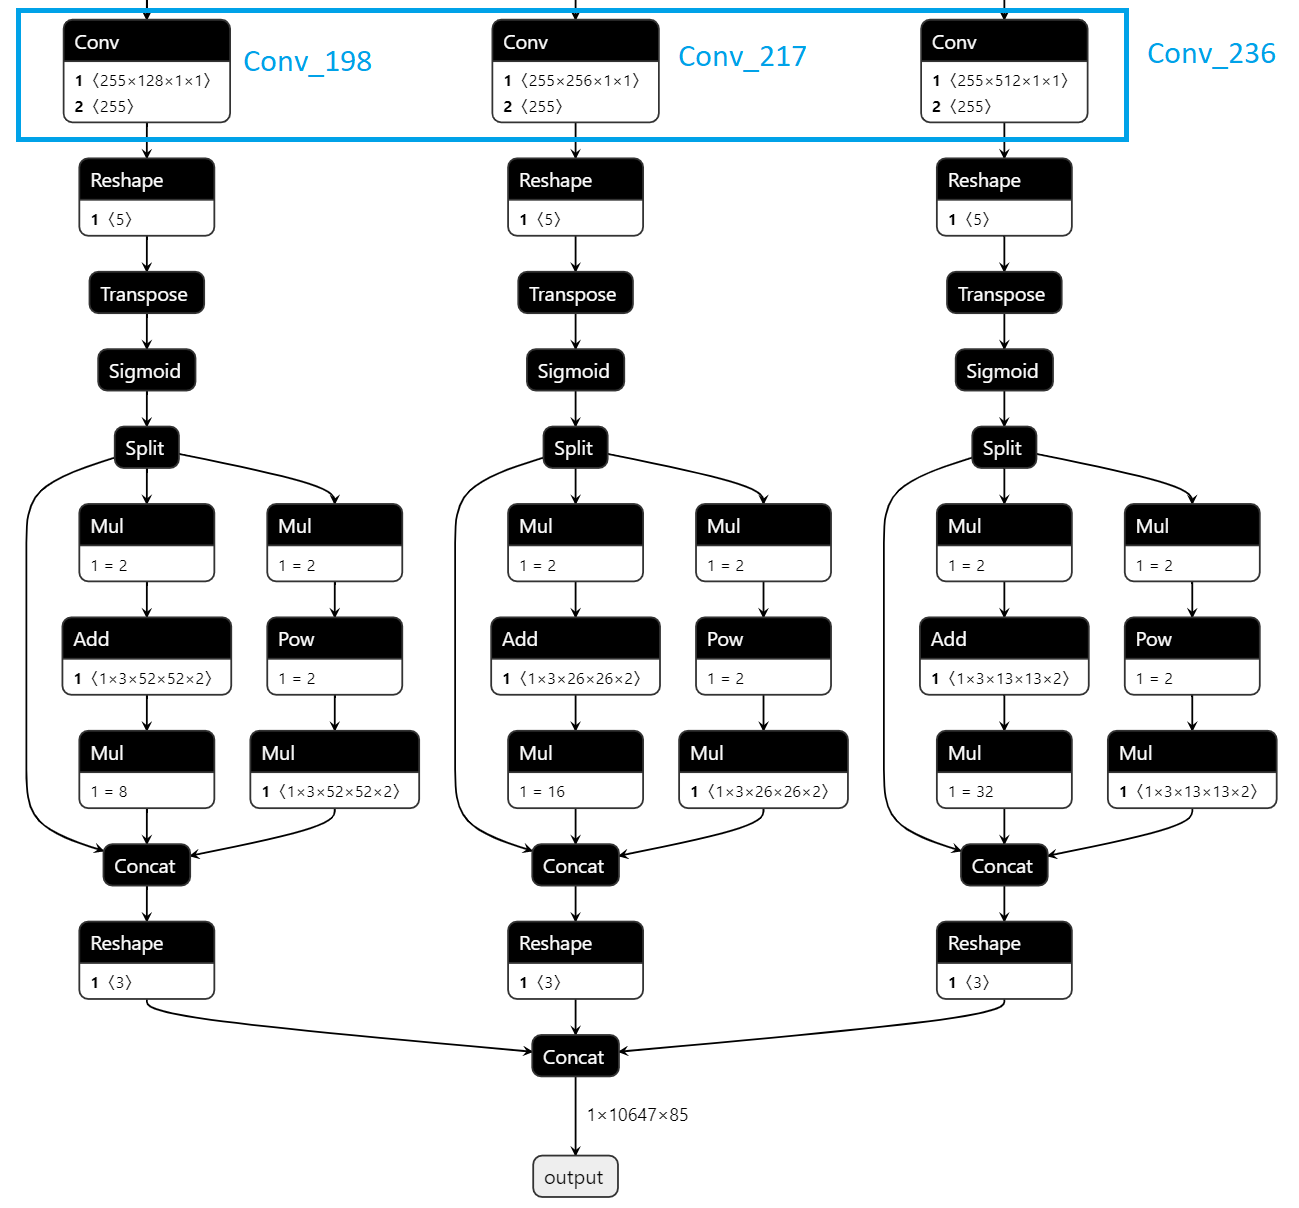
mo  --input_model yolov5s.onnx --model_name yolov5s --scale 255 --reverse_input_channels --output Conv_198,Conv_217,Conv_236 --data_type FP16 --output_dir yolov5/FP16
mo  --input_model yolov5s.onnx --model_name yolov5s --scale 255 --reverse_input_channels --output Conv_198,Conv_217,Conv_236 --data_type FP32 --output_dir yolov5/FP32
Note: Output layer names will vary for yolov5l, yolov5m etc
For more details on Model Optimizer, see Model Optimizer from OpenVINO™ Toolkit As explained in Model Files Format section, the model layout will be as shown below:
yolov5
├── FP16
│   ├── yolov5s.bin
│   ├── yolov5s.mapping
│   └── yolov5s.xml
└── FP32
    ├── yolov5s.bin
    ├── yolov5s.mapping
    └── yolov5s.xml
4. Model Pre/Post Processing#
This model did not require any custom pre/post-processing. For post-processing, a converter named yolo_v5 has been implemented that handles the transformation of the results from raw output
InferenceEngine::Blob to required representation that contains confidence and bounding box center coordinates and dimensions.
A model-proc file has been included for yolov5 at yolo-v5.json.
Note: The above model proc has been tested with yolov5s with input size of 416 and 460, for other yolov5 variants changes may be required, see How to Create Model Proc for more details on settings like
bbox_number_on_cell,cells_numberetc.
5. Running a GStreamer pipeline#
As covered in Model Files Format section, you will have to set model, model-proc properties for the gvadetect element
gvadetect model=MODEL1_FILE_PATH.xml model-proc=MODEL1_FILE_PATH.json !
For batch sizes > 1, there is no additional preparation needed, one can run by setting batch_size
gvadetect model=MODEL1_FILE_PATH.xml model-proc=MODEL1_FILE_PATH.json batch-size=2!